开始使用 Apollo Server
本教程帮助您
- 了解GraphQLGraphQL原则
- 定义一个代表您数据集结构的GraphQL 模式,
- 运行一个Apollo Server实例,允许您对您的模式执行查询
本教程假定您熟悉命令行和JavaScript,并已安装了较新的Node.js(v14.16.0+)版本。另外,对于那些感兴趣的,本教程还包括一个可选部分,描述如何使用TypeScript设置Apollo Server
步骤1:创建新项目
- 从您首选的开发目录,为该项目创建一个目录并
cd进入该目录:
mkdir graphql-server-examplecd graphql-server-example
- 使用
npm(或您喜欢的其他包管理工具,如Yarn) 初始化一个新的Node.js项目:
npm init --yes && npm pkg set type="module"
本入门指南使用ES模块设置项目,这简化了我们的示例并允许我们使用顶层await.
您的项目目录现在包含一个package.json文件。
第二步:安装依赖
运行graphql (也称为graphql-js) 需要Apollo Server两个顶层依赖项:
@apollo/server是用于Apollo Server本身的库。Apollo Server知道如何将HTTP请求和响应转换为GraphQL操作- 并运行它们在一个可扩展的环境中,支持插件和其他功能。
运行以下命令安装这两个包,并将它们存储在您的项目的node_modules目录中:
npm install @apollo/server graphql
按照以下说明,使用TypeScript或JavaScript进行设置
第三步:定义你的GraphQL模式
ⓘ 注意
下面的代码块默认使用TypeScript。您可以使用每个代码块上方的下拉菜单将其切换为JavaScript。
如果您使用JavaScript,则在出现的地方使用.js和.jsx文件扩展名取代。
每个GraphQL服务器(包括Apollo Server)都使用一个模式来定义客户端可以查询的数据结构。在本例中,我们将创建一个服务器,通过标题和作者查询书籍集合。
在你的偏好代码编辑器中打开index.ts,并将以下内容粘贴进去:
import { ApolloServer } from '@apollo/server';import { startStandaloneServer } from '@apollo/server/standalone';// A schema is a collection of type definitions (hence "typeDefs")// that together define the "shape" of queries that are executed against// your data.const typeDefs = `#graphql# Comments in GraphQL strings (such as this one) start with the hash (#) symbol.# This "Book" type defines the queryable fields for every book in our data source.type Book {title: Stringauthor: String}# The "Query" type is special: it lists all of the available queries that# clients can execute, along with the return type for each. In this# case, the "books" query returns an array of zero or more Books (defined above).type Query {books: [Book]}`;
import { ApolloServer } from '@apollo/server';import { startStandaloneServer } from '@apollo/server/standalone';// A schema is a collection of type definitions (hence "typeDefs")// that together define the "shape" of queries that are executed against// your data.const typeDefs = `#graphql# Comments in GraphQL strings (such as this one) start with the hash (#) symbol.# This "Book" type defines the queryable fields for every book in our data source.type Book {title: Stringauthor: String}# The "Query" type is special: it lists all of the available queries that# clients can execute, along with the return type for each. In this# case, the "books" query returns an array of zero or more Books (defined above).type Query {books: [Book]}`;
在模板字面量开头添加#graphql可以为支持该功能的IDE提供GraphQL语法高亮。
此段代码定义了一个简单、有效的GraphQL模式,客户端将能够执行名为query的查询,我们的服务器将返回含有零个或多个Book对象的数组。
第4步:定义你的数据集
现在我们已经定义了数据的结构,我们可以定义实际的数据。
Apollo Server可以从您连接的任何数据源中获取数据(包括数据库、REST API、静态对象存储服务,甚至是另一个GraphQL服务器)。在本教程中,我们将硬编码示例数据。
将以下内容添加到您的index.ts文件底部:
const books = [{title: 'The Awakening',author: 'Kate Chopin',},{title: 'City of Glass',author: 'Paul Auster',},];
const books = [{title: 'The Awakening',author: 'Kate Chopin',},{title: 'City of Glass',author: 'Paul Auster',},];
此代码段定义了一个简单的数据集,供客户端查询。注意,数组中的两个对象都符合我们在模式中定义的Book类型。
第5步:定义解析器
我们已经定义了我们的数据集,但是Apollo Server不知道它在执行查询时应该使用哪个数据集。为了修复这个问题,我们创建了一个解析器。
解析器告诉Apollo Server如何获取与特定类型相关联的数据。因为我们的Book数组是硬编码的,因此对应的解析器是简单的。
将以下内容添加到您的index.ts文件底部:
// Resolvers define how to fetch the types defined in your schema.// This resolver retrieves books from the "books" array above.const resolvers = {Query: {books: () => books,},};
// Resolvers define how to fetch the types defined in your schema.// This resolver retrieves books from the "books" array above.const resolvers = {Query: {books: () => books,},};
第6步:创建一个 ApolloServer 实例
我们已经定义了模式、数据集和解析器。现在我们需要在我们初始化时将此信息提供给Apollo Server。
将以下内容添加到您的index.ts文件底部:
// The ApolloServer constructor requires two parameters: your schema// definition and your set of resolvers.const server = new ApolloServer({typeDefs,resolvers,});// Passing an ApolloServer instance to the `startStandaloneServer` function:// 1. creates an Express app// 2. installs your ApolloServer instance as middleware// 3. prepares your app to handle incoming requestsconst { url } = await startStandaloneServer(server, {listen: { port: 4000 },});console.log(`🚀 Server ready at: ${url}`);
// The ApolloServer constructor requires two parameters: your schema// definition and your set of resolvers.const server = new ApolloServer({typeDefs,resolvers,});// Passing an ApolloServer instance to the `startStandaloneServer` function:// 1. creates an Express app// 2. installs your ApolloServer instance as middleware// 3. prepares your app to handle incoming requestsconst { url } = await startStandaloneServer(server, {listen: { port: 4000 },});console.log(`🚀 Server ready at: ${url}`);
第7步:启动服务器
我们现在可以启动我们的服务器了!从您项目的根目录运行以下命令
npm start
现在您应该在终端底部看到以下输出
🚀 Server ready at: https://:4000/
我们已经启动并运行了!
第8步:执行您的第一个查询
我们现在可以在服务器上执行GraphQL查询。要执行我们的第一个查询,我们可以使用Apollo Sandbox。
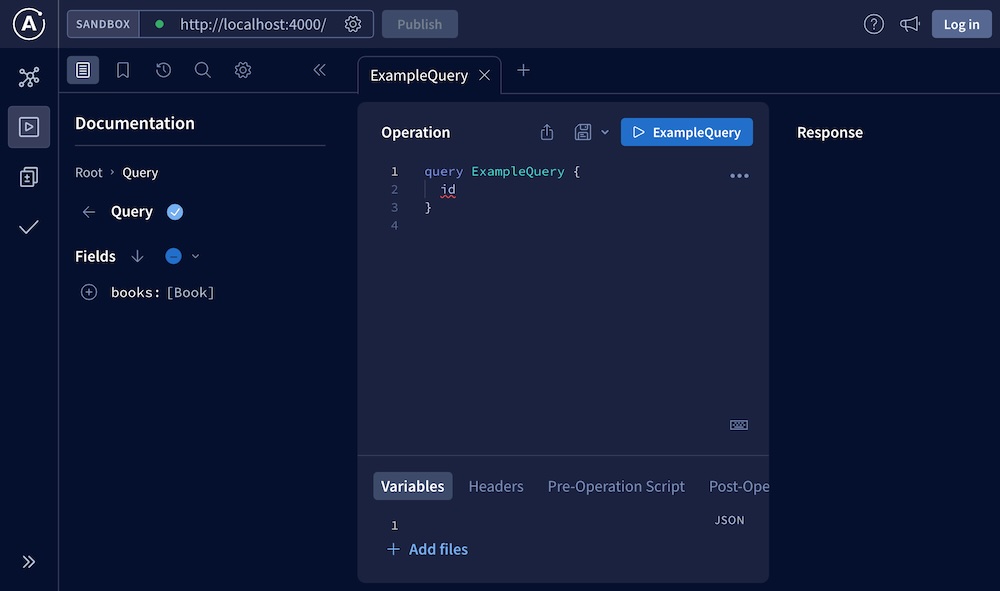
在浏览器中访问https://:4000,这将打开Apollo Sandbox:

Sandbox UI包括
- 用于编写和执行查询的操作面板(在中间)
- 用于查看查询结果的响应面板(在右侧)
- 用于方案探索、搜索和设置的选项卡(在左侧)
- 用于连接到其他GraphQL服务器的URL栏(在上左角)
我们的服务器支持一个名为books的单个查询。让我们执行它!
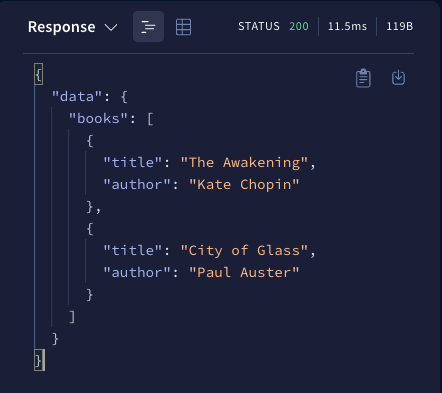
这是执行books查询的GraphQL查询字符串:
query GetBooks {books {titleauthor}}
将此字符串粘贴到 操作 面板中,然后点击右上角的蓝色按钮。结果(来自我们的硬编码数据集)将显示在响应面板中:

注意: 如果 Apollo Sandbox 找不到您的模式,请确保您已经启用 内省 通过将 introspection: true 传递给 ApolloServer 构造函数。我们建议在生产环境中使用 Apollo Server 时禁用 内省。
GraphQL 中最重要的概念之一是客户端可以选择选择性地 查询 他们需要的字段。从查询字符串中删除 author 并重新执行。响应更新,只包括每本书的 title 字段!
完整示例
您可以在 CodeSandbox 上查看和复制完整示例
在 CodeSandbox 中编辑下一步
此示例应用程序是使用 Apollo Server 的绝佳起点。检查以下资源以了解更多有关模式、 解析器 和生成类型的基础知识:
想了解如何模块化和扩展 GraphQL API 吗?请参阅 Apollo Federation 文档 学习如何通过组合多个 GraphQL API 来创建统一的 超图。
如果您想使用特定 Web 框架与 Apollo Server,请参阅我们的 集成列表。如果没有我们最喜欢的框架的 Apollo Server 集成,您可以通过 构建一个 来帮助我们的社区!