概述
所以现在我们已经有了我们的计划子图!为了将我们的重点放在特定于联合的概念上,FlyBy 启动存储库已经附带了基础服务器代码。让我们看看目前为止已经构建了什么。
在本课中,我们将
- 探索为
locations和reviews服务器 - 使用
@apollo/subgraph包将locations和reviews服务器从普通的 GraphQL 服务器 转换为 子图。
探索启动代码
让我们首先查看为我们的 子图 目前构建的内容。
The locations 子图
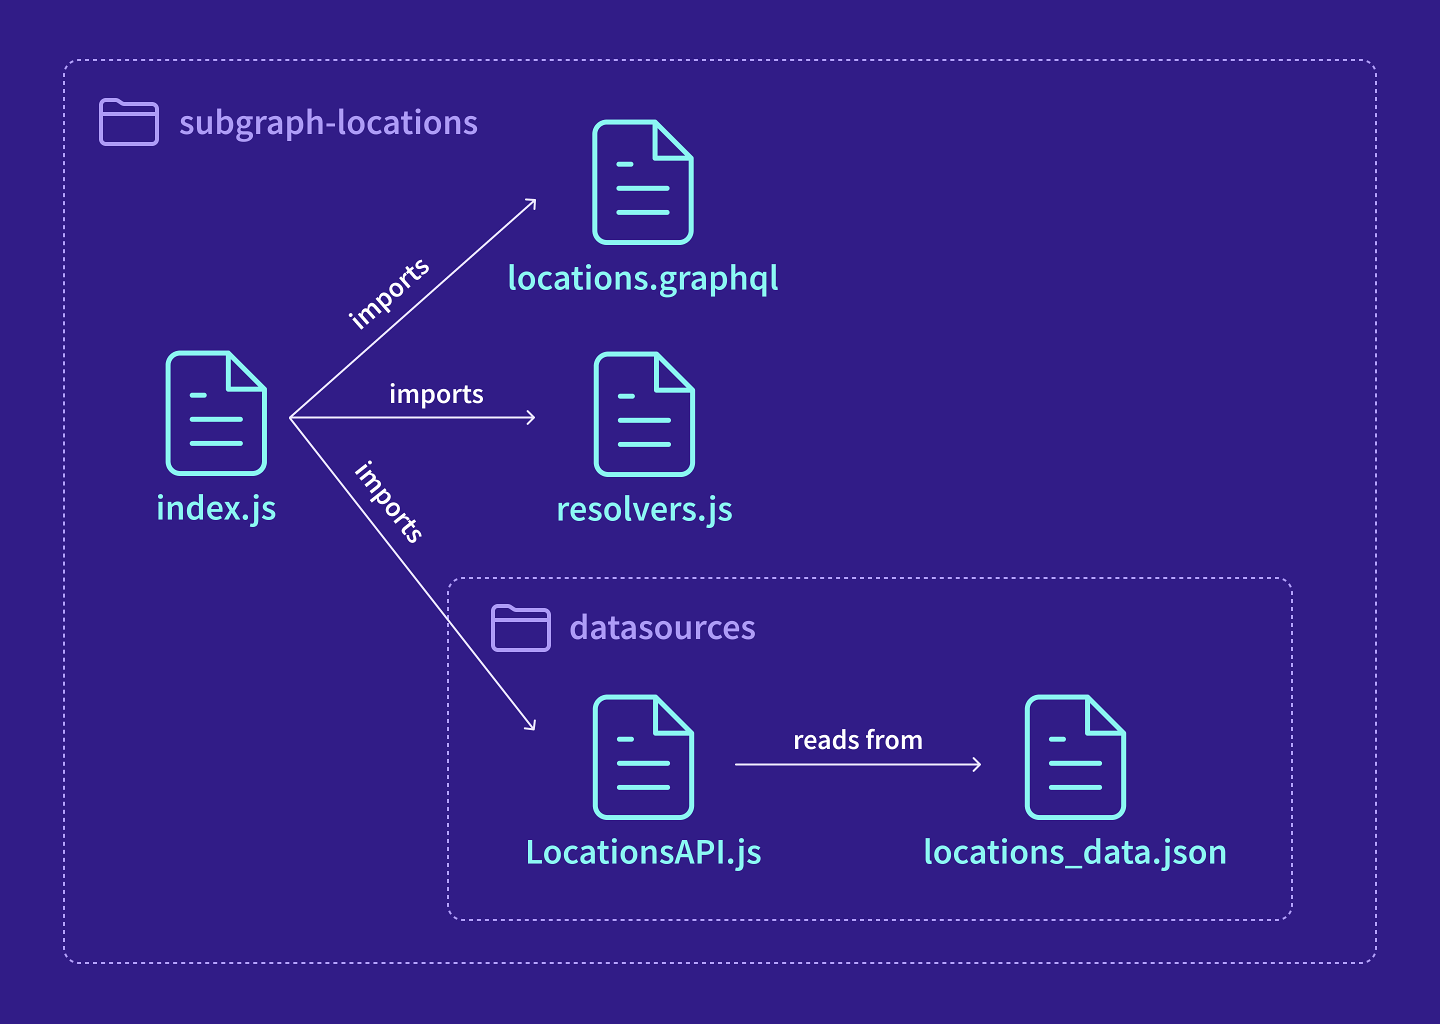
我们将从 locations 子图 开始。这是一个架构图,显示了 subgraph-locations 目录中的文件以及它们之间的连接方式:

index.js:创建了一个ApolloServer实例,它在端口4001上运行。到目前为止,这只是一个普通的 GraphQL 服务器,而不是一个 子图。locations.graphql:一个模式,它定义了 子图 拥有的类型和 字段。resolvers.js:为locations模式中的 字段 定义 解析器 函数。datasources/LocationsApi.js:从locations_data.json文件中检索位置数据。- 注意: 在实际应用中,这个 数据源 将与 REST API 或数据库进行通信,但我们处于教程阶段,因此我们将坚持使用硬编码的假数据。
datasources/locations_data.json:一个包含硬编码位置数据的 JSON 对象。
花点时间查看这些文件,熟悉它们的内容。
让我们使用到目前为止已添加到我们的 locations 子图 中的 字段 更新我们的模式协议清单:

The reviews 子图
接下来是 reviews 子图。 subgraph-reviews 目录中的文件具有与我们的 locations 子图 相似的结构。
让我们跳过并再次更新我们的模式协议清单。我们将勾选到目前为止已添加到我们的 reviews 子图 中的 字段。

请记住,我们现在将这三个 字段 (Location.reviewsForLocation, Location.overallRating 和 Review.location) 暂时搁置,我们将在课程的后面部分再讲解它们!
✏️ 启动子图服务器
让我们启动这些 子图服务器。首先,是 locations 的 子图。
在命令行中,导航到
subgraph-locations目录:cd subgraph-locations通过运行以下命令启动
locations服务器:npm start您应该会看到类似于下面的成功消息
🚀 Subgraph locations running at https://:4001/在我们跳转到查看我们的 子图 之前,让我们将这个终端窗口重命名为
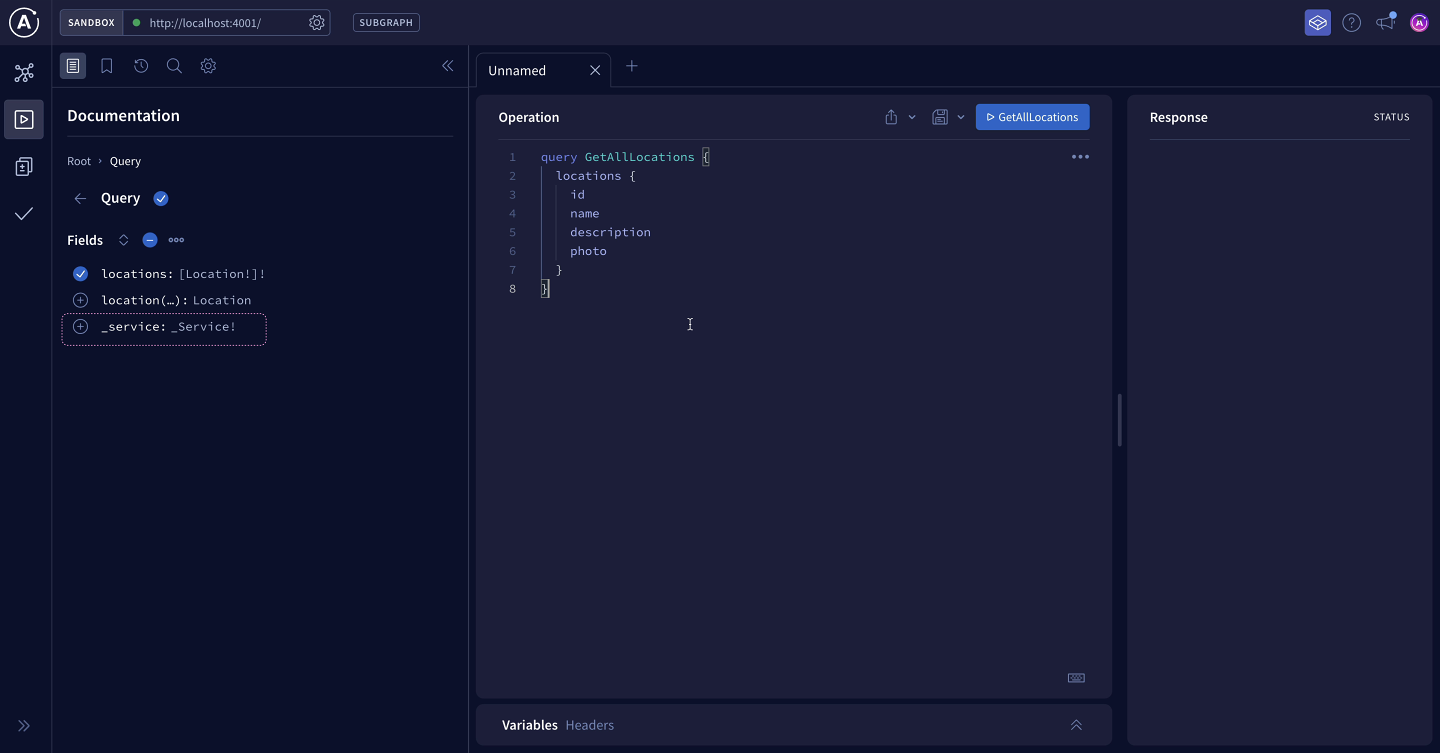
subgraph-locations,以便稍后更容易返回到我们正在运行的服务器。在 Web 浏览器中,转到 https://:4001 以在 Apollo Sandbox 中打开您的服务器。让我们通过运行以下 查询 来测试
locations服务器是否正常工作:query GetAllLocations {locations {idnamedescriptionphoto}}当我们运行这个 查询 时,我们可以看到 locations 服务器正确地发回了我们的数据,完美!
现在,让我们启动 reviews 的 子图,它将遵循类似的步骤!
打开一个新的终端窗口,并导航到
subgraph-reviews目录:cd subgraph-reviews通过运行以下命令启动
reviews服务器:npm start您应该会看到类似于下面的成功消息
🚀 Subgraph reviews running at https://:4002/
让我们也把这个终端窗口重命名为 subgraph-reviews,以便稍后更容易找到它。
在另一个浏览器标签页中打开
https://:4002,并使用 Sandbox 查询您的服务器。我们将通过运行以下 查询 来测试
reviews服务器是否正常工作:query GetLatestReviews {latestReviews {idcommentrating}}我们获得了数据。太棒了!
转换为子图服务器
到目前为止,我们的 locations 和 reviews 服务器只是普通的 GraphQL 服务器,但我们即将把它们转换为官方的 子图服务器!
这需要两个步骤
- 向我们的 子图模式 文件添加联邦 2 定义
- 更新我们的
ApolloServer实例
✏️ 联邦 2 定义
让我们先处理 locations 的 子图。
打开 locations.graphql 文件,并将以下联邦 2 定义粘贴到该文件顶部:
extend schema@link(url: "https://specs.apollo.dev/federation/v2.7",import: ["@key"])
这让我们可以采用 Apollo Federation 的最新功能。它还允许我们导入我们想要在模式文件(如 @key 指令,如上所示)中使用的各种 指令。我们将稍后讲解 @key 指令,所以现在不用太担心这个语法。
如果您的终端此时显示错误,请不要担心。在我们完成下一步后,这些错误会消失。
✏️ 更新我们的 ApolloServer 实例
下一步是更新我们的 ApolloServer 实现。
让我们从 locations 服务器开始:
在新的终端窗口中,导航到
subgraph-locations目录。运行以下命令安装
@apollo/subgraph包。(这将把@apollo/subgraph添加到package.json文件和node_modules目录。)npm install @apollo/subgraph在代码编辑器中打开
subgraph-locations/index.js文件。从@apollo/subgraph导入buildSubgraphSchema函数。subgraph-locations/index.jsconst { ApolloServer } = require("@apollo/server");const { startStandaloneServer } = require("@apollo/server/standalone");const { buildSubgraphSchema } = require("@apollo/subgraph");在下面,在我们初始化
ApolloServer的地方,我们现在将把现有的typeDefs和resolvers属性作为 对象 传递到buildSubgraphSchema函数中。然后,我们将使用结果设置一个名为
schema的新ApolloServer配置属性。subgraph-locations/index.jsconst server = new ApolloServer({schema: buildSubgraphSchema({ typeDefs, resolvers }),});
buildSubgraphSchema 函数在做什么?
buildSubgraphSchema 函数接受包含 typeDefs 和 resolvers 的对象,并返回一个适合联邦的 子图模式。此模式包含一些 联邦指令和类型,使我们的 子图 能够充分利用联邦功能。我们稍后会详细讲解!
当我们将对服务器文件所做的更改保存后,本地运行的
locations服务器应会自动重启。现在,让我们检查一下是否一切正常!让我们返回到在 Apollo Sandbox 中运行的浏览器窗口,地址为https://:4001。在
Query根类型下,我们应该看到一个新的 字段,_service。这是联邦特定的 字段 之一,buildSubgraphSchema添加到 子图 中。 路由器 使用此 字段 访问您 子图模式 的 SDL 字符串。 我们不会直接使用此字段,但看到它出现在 Explorer 中告诉我们我们的子图正在正常运行。

现在我们已经设置了 locations 子图,是时候为 reviews 子图 重复此过程了! 只需按照与之前相同的流程操作即可。 你行!
提示:如果您卡住了,始终可以检查 final 目录以获取提示。
练习
ApolloServer 实例成为子图,我们安装了一个名为 ApolloServer 配置对象中。将项目从此框拖到上面的空白处
router
子图模式
dataSources@apollo/server@apollo/federationbuildSubgraphSchemaresolversfieldstypeDefsschemabuildSupergraph@apollo/subgraph
关键要点
- 将 Federation 2 定义添加到我们模式文件顶部,使我们能够选择加入 Apollo Federation 2 中提供的最新功能。
- 为了使
ApolloServer实例成为适用于联邦的 子图,请使用buildSubgraphSchema函数,该函数来自@apollo/subgraph包。
下一步
我们的 子图 已经启动并运行了! 但这只是我们 超级图 架构的第一部分。
在下一课中,我们将更详细地了解如何使用 托管联邦 将我们 超级图 的所有部分整合在一起。
分享您对本课的疑问和评论
您的反馈将帮助我们改进! 如果您卡住了或感到困惑,请告诉我们,我们将帮助您解决问题。 所有评论都是公开的,必须遵循 Apollo 行为准则。 请注意,已解决或已处理的评论可能会被删除。
您需要一个 GitHub 帐户才能在下面发帖。 没有帐户吗? 请在我们的 Odyssey 论坛上发帖。
