在CI/CD中使用Rover
将Rover集成到持续集成和持续部署工作流程中
您可以使用Rover在任何使用Rover支持的操作系统的CI/CD环境中(Linux、MacOS或Windows)。通常,这是为了运行模式检查,并且使用rover graph check或rover subgraph check。
Rover的安装类似于许多其他的CLI工具,但是推荐的安装方法取决于您使用的提供商。我们为一些最常见的CI/CD提供商提供了安装说明:
如果您正在使用未在此列表中列出的CI/CD供应商与Rover,我们很乐意您通过打开一个问题或拉取请求来分享这些步骤。
CircleCI
Linux作业使用curl安装程序
通常在安装时,Rover会将它的可执行文件路径添加到您的$PATH中。但是,CircleCI 不会在$PATH变量步骤之间使用。这意味着,如果您安装了Rover,并在下一步尝试运行它,则会收到错误信息:command not found: rover。
要解决这个问题,您可以对$PATH进行修改,并将其附加到$BASH_ENV。 $BASH_ENV在每个步骤的开始执行,使得任何更改都能在步骤间维持。您可以使用$BASH_ENV将Rover添加到您的$PATH中,如下所示:
echo 'export PATH=$HOME/.rover/bin:$PATH' >> $BASH_ENV
按照上述方法安装Rover并修改$BASH_ENV后,Rover应正常工作。
ⓘ 注意
由于rover config auth命令是交互式的,您需要在您项目的设置中使用环境变量进行认证。
完整示例
# Use the latest 2.1 version of CircleCI pipeline process engine. See: https://circleci.com/docs/2.0/configuration-referenceversion: 2.1jobs:build:docker:- image: cimg/node:15.11.0steps:- run:name: Installcommand: |# download and install Rovercurl -sSL https://rover.apollo.dev/nix/v0.26.0-rc.0 | sh# This allows the PATH changes to persist to the next `run` stepecho 'export PATH=$HOME/.rover/bin:$PATH' >> $BASH_ENV- checkout# after rover is installed, you can run it just like you would locally!# only run this command with the `--background` flag if you have the Apollo Studio GitHub integration enabled on your repository- run: rover graph check my-graph@prod --schema ./schema.graphql --background
GitHub Actions
在GitHub拉取请求中显示架构检查结果
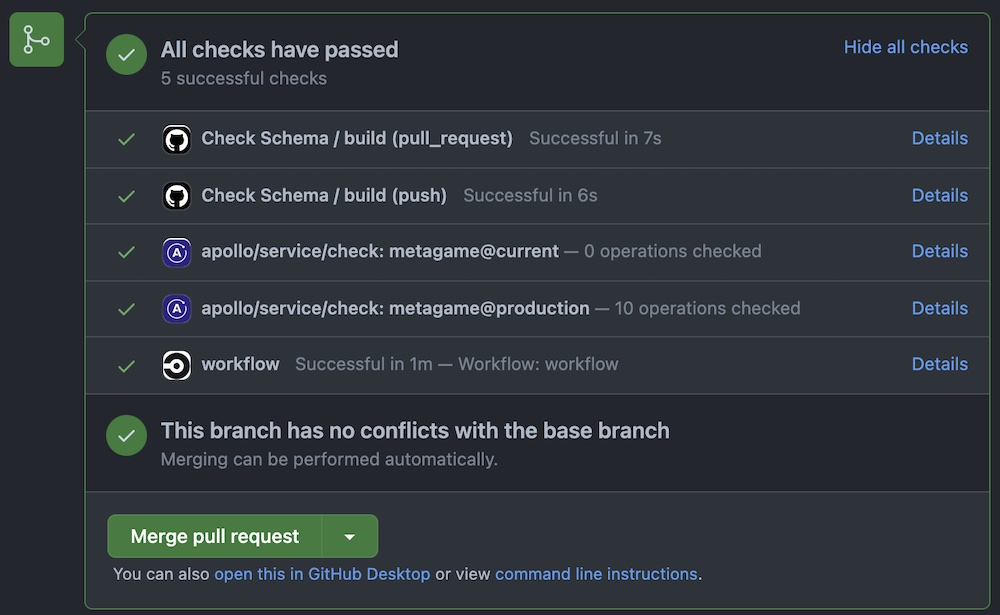
如果您使用GitHub Actions在每次拉取请求时自动运行架构检查(如下所示),您可以为Apollo Studio GitHub应用程序(Apollo Studio GitHub app,将检查结果链接添加到您的其他拉取请求检查中:

要正确显示拉取请求中的架构检查结果,您需要确保Rover将架构检查的执行与拉取请求的HEAD提交关联,而不是GitHub添加的合并提交。为了确保这一点,您需要在动作的配置中设置APOLLO_VCS_COMMIT环境变量,如下所示:
env:APOLLO_VCS_COMMIT: ${{ github.event.pull_request.head.sha }}
使用curl安装程序在Linux/MacOS作业中
通常在安装时,Rover会将可执行文件的位置添加到您的$PATH。但是,GitHub Actions不会在不同步骤之间使用$PATH变量。这意味着,如果您安装Rover并尝试在下一步中运行它,您将收到command not found: rover错误。
要解决这个问题,您可以将Rover的位置附加到$GITHUB_PATH变量。 $GITHUB_PATH类似于系统的$PATH变量,并且对$GITHUB_PATH的修改可以在多个步骤之间使用。您可以像这样修改它:
echo "$HOME/.rover/bin" >> $GITHUB_PATH
ⓘ 注意
由于rover config auth命令是交互式的,您需要在您项目的设置中使用环境变量进行认证。
GitHub Actions 使用 项目环境 来设置保密环境变量。在你自己的操作中,你可以通过名称选择一个 build.environment 并使用已保存的保密项来设置 build.env 变量。
以下是一个完整示例脚本,展示如何选择一个 apollo 环境,并设置一个 APOLLO_KEY 变量:
完整示例
# .github/workflows/check.ymlname: Check Schema# Controls when the action will run. Triggers the workflow on push or pull request eventson: [push, pull_request]# A workflow run is made up of one or more jobs that can run sequentially or in paralleljobs:# This workflow contains a single job called "build"build:# The type of runner that the job will run onruns-on: ubuntu-latest# https://githubdocs.cn/en/actions/reference/environmentsenvironment: apollo# https://githubdocs.cn/en/actions/reference/encrypted-secrets# https://githubdocs.cn/en/actions/reference/workflow-syntax-for-github-actions#jobsjob_idstepsenvenv:APOLLO_KEY: ${{ secrets.APOLLO_KEY }}APOLLO_VCS_COMMIT: ${{ github.event.pull_request.head.sha }}# Steps represent a sequence of tasks that will be executed as part of the jobsteps:# Checks-out your repository under $GITHUB_WORKSPACE, so your job can access it- uses: actions/checkout@v2- name: Install Roverrun: |curl -sSL https://rover.apollo.dev/nix/v0.26.0-rc.0 | sh# Add Rover to the $GITHUB_PATH so it can be used in another step# https://githubdocs.cn/en/actions/reference/workflow-commands-for-github-actions#adding-a-system-pathecho "$HOME/.rover/bin" >> $GITHUB_PATH# only run this command with the `--background` flag if you have the Apollo Studio GitHub integration enabled on your repository- name: Run check against prodrun: |rover graph check my-graph@prod --schema ./test.graphql --background
Bitbucket Pipelines
以下是一个针对 Bitbucket Pipelines 的完整示例配置。它展示了如何
- 在每个分支的每个提交上运行
rover subgraph check。 - 运行
rover subgraph publish以保持你的mainbranching 的模式定义与基本 版本(在本例中是@local)同步。
示例使用以下 Pipeline 仓库 变量,以使管道配置在不同仓库之间可移植:
APOLLO_KEYAPOLLO_SUBGRAPH_NAME,表示你将要运行 模式检查的 子图的名称APOLLO_LOCAL_PORT,表示基础 变体的端口号
完整示例
# ./bitbucket-pipelines.ymlimage: nodedefinitions:steps:- step: &rover-subgraph-checkname: "[Rover] Subgraph Check"caches:- nodescript:- 'echo "Subgraph name: $APOLLO_SUBGRAPH_NAME"'- npx -p @apollo/rover@latestrover subgraph check my-graph@prod--name $APOLLO_SUBGRAPH_NAME--schema ./schema.graphql- step: &local-publishname: "[Rover] @local publish (sync with main/master)"caches:- nodescript:- 'echo "Subgraph name: $APOLLO_SUBGRAPH_NAME"'- 'echo "Local variant port: $APOLLO_LOCAL_PORT"'- npx -p @apollo/rover@latestrover subgraph publish my-graph@local--name $APOLLO_SUBGRAPH_NAME--schema ./schema.graphql--routing-url http://:$APOLLO_LOCAL_PORT/graphqlpipelines:default:- step: *rover-subgraph-checkbranches:'{main,master}':- step: *rover-subgraph-check- step: *local-publish
Jenkins
要设置 Rover 以用于 Jenkins,首先考虑你将在管道中使用哪种类型的 Jenkins agent。下面的示例演示了一个使用 Docker 的 golang 管道,但你可以根据具体需求进行修改。
通过 node 代理进行分布式构建
如果你使用 node 代理类型进行分布式构建,请确保将 Rover 安装在所有机器上,无论是作为基础镜像的一部分,还是通过设置脚本。确保它通过 PATH 环境变量全局可用。
使用 Docker 的管道
如果你在启用了 Docker 的管道中使用 Rover,请注意以下额外的考虑事项:
$PATH 问题
通常在安装时, Rover会将它的可执行文件的路径添加到您的$PATH中。然而,Jenkins不会在sh步骤的运行之间持久化$PATH变量,因为每个sh块都作为自己的进程运行。这意味着,如果您安装了Rover并尝试在下一步运行它,您将得到一个command not found: rover错误。这与CircleCI的说明功能类似,但解决方案不同。
为了避免这个问题,请执行以下操作之一
使用脚本,但通过完整路径引用
rover($HOME/.rover/bin/rover)通过cURL下载最新版本并像这样提取二进制文件(以下下载适用于Linux x86架构的Rover版本
0.23.0):curl -L https://github.com/apollographql/rover/releases/download/v0.26.0-rc.0/rover-v0.26.0-rc.0-x86_64-unknown-linux-gnu.tar.gz | tar --strip-components=1 -zxv
权限问题
如果在Docker中遇到权限问题,您可以通过创建用户来运行安装和构建过程来解决其中许多问题。以下示例Dockerfile显示了如何使用特定的Docker镜像完成此操作,用于您的Jenkins构建管道。
FROM golang:1.18RUN useradd -m rover && echo "rover:rover" | chpasswdUSER roverRUN curl -sSL https://rover.apollo.dev/nix/latest | sh
Jenkinsfile配置
适当安装 Rover后,您可以在sh步骤中执行rover命令,如下面的示例配置所示。由于rover通过stderr输出日志并发出正确的状态码,如果rover subgraph检查命令失败,它会产生构建错误。
我们建议通过环境变量将参数传递给参数,这样就可以重用您的管道中的大部分内容,使其更容易快速部署新的子图而无需重写代码。
此外,我们强烈建议使用Jenkins凭证传入APOLLO_KEY,并在您的jenkinsfile中使用credentials(key_name)引用它。以下是一个示例。
pipeline {agent {dockerfile {filename './build_artifacts/Dockerfile'}}stages {stage('Rover Check') {steps {sh '''echo "Subgraph: $APOLLO_SUBGRAPH_NAME$HOME/.rover/bin/rover subgraph check $APOLLO_GRAPH_REF --name $APOLLO_SUBGRAPH_NAME --schema $SCHEMA_PATH'''}}stage('Build') {steps {sh 'go build .'}}stage('Go Test') {steps {sh 'go test ./... -v'}}stage('Schema Publish to Dev') {when {expression { env.BRANCH_NAME == 'main' }}steps {sh '$HOME/.rover/bin/rover subgraph publish $APOLLO_GRAPH_REF --name $APOLLO_SUBGRAPH_NAME --schema $SCHEMA_PATH'}}}environment {APOLLO_KEY = credentials('apollo_key')APOLLO_SUBGRAPH_NAME = 'products'APOLLO_CONFIG_HOME = '~/.config/rover'SCHEMA_PATH = './graph/schema.graphqls'APOLLO_GRAPH_REF = 'AolloJenkins@dev'}}
Gitlab
由于Rover没有官方的Docker镜像,我们可以使用debian:stable-slim作为基础镜像。你所需要做的只是通过cURL获取源代码,将可执行文件添加到PATH变量中,然后发布你的subgraphs。
push_subgraphs:stages:- publish_subgraphspublish_subgraphs:stage: publish_subgraphsimage: debian:stable-slimretry: 1 # to retry if any connection issue or such happensbefore_script:- apt-get update && apt-get install curl -yscript:- curl -sSL https://rover.apollo.dev/nix/latest | sh # Install the latest version of Rover- export PATH="$HOME/.rover/bin:$PATH" # Manually add it to the ruuner PATH- export APOLLO_KEY=$APOLLO_FEDERATION_KEY- rover subgraph publish $APOLLO_GRAPH_REF --name $APOLLO_SUBGRAPH_NAME --schema $SCHEMA_PATH
与npm/npx一起使用
如果你在Node.js工作流中运行,使用Rover的NPM发行版可能更容易。这样,你就不需要调整PATH就可以运行Rover,这也许更适合你的现有工作流程。
您可以通过将这些说明添加到您的 package.json 依赖项中来使用 Rover,并使用npm脚本来执行它,类似于您可能已经熟悉的其他工作流程。如果您不想将 Rover 作为依赖项安装,可以使用带有 -p 标志的 npx 来运行它:
ⓘ 注意
只有在您的存储库启用了 Apollo Studio GitHub 集成的情况下,才使用 --background 标志运行此命令。
npx -p @apollo/rover rover graph check my-graph@prod --schema=./schema.graphql --background
由于大多数命令都需要您进行身份验证,请参阅上面的部分以获取为 CI/CD 提供商添加环境变量的说明。